
IPAM
IPAM (IP address management) is the catalog of your networks and of the IP addresses they use. It answers everyday questions: which address can I give to the new printer, who is using 10.0.10.25, how full is the network of the second floor, which VLAN is the warehouse on.
Open Networking › IPAM.
IPAM is a catalog, not a scanner. You register the networks yourself; the addresses of network devices and computers are added automatically from the data Device Inventory Manager already has, and you add the others by hand.
Where the addresses come from
| Type | Source | Updated |
|---|---|---|
| Network device (from scan) | The devices found by the network probe. | Automatically. |
| Windows PC, Mac | Windows and macOS devices: one address for each network adapter (wired, Wi-Fi, other, virtual) reported by the agent, or the wired and Wi-Fi addresses reported by Microsoft Intune when the agent is not installed. | Automatically. |
| Entered manually | Addresses you add with New address or with an import: servers with a static IP, reservations, devices that are not in the inventory. | By you. |
An address enters the catalog only if it falls within a network you registered. This keeps out, for example, the home addresses of laptops used remotely. Link-local (169.254.x.x) and loopback (127.x.x.x) addresses are never added. Decommissioned and sold computers are left out.
Automatic addresses follow the device: if a computer gets a new IP address, its row moves to the new address and keeps its description. They are updated after every synchronization of your devices, after every new scan of the probe and whenever you change a network, and in any case once a day.
Networks
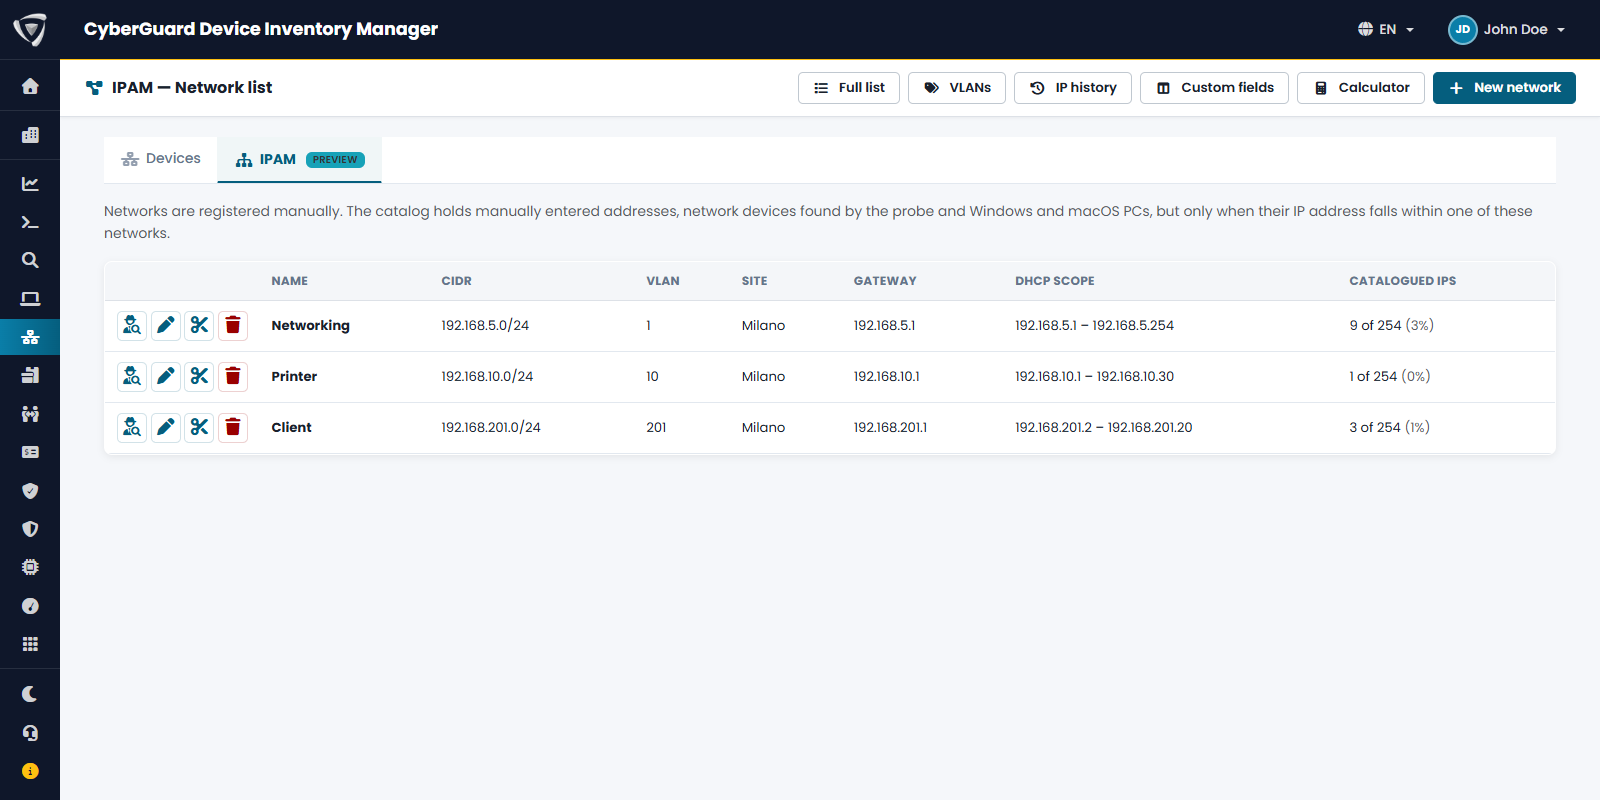
The IPAM — Network list page shows your networks as a tree: the subnets created with Split into subnets appear under their network. For each network you see the CIDR, the number of Subnets, the VLAN number (its name appears when you hover over it), Site, Gateway, DHCP scope and Catalogued IPs, the number of addresses in the catalog out of the usable ones, with the percentage.
The icons at the start of each row open the addresses of the network, edit it, split it into subnets, merge it with its twin network and delete it.
Adding a network
- Click New network.
- Fill in the fields and click Save.
| Field | Purpose |
|---|---|
| Name | For example Office LAN. Required. |
| Network (CIDR) | For example 10.0.10.0/24. IPv4 only, from /8 to /32. Required. Reserved ranges (0.0.0.0/8, loopback, APIPA 169.254.0.0/16, multicast and above) are not accepted. |
| VLAN | A number from 1 to 4094. The name comes from the VLAN catalog. |
| Site | The site of the network. Network devices go into the network of their own site. |
| Company | Only if your organization has several companies: computers go into the network of their own company. |
| Gateway | A host address of the network: not the network or broadcast address, and outside the DHCP scope. |
| DNS servers | Up to 8 IPv4 addresses separated by commas, for example 10.0.0.10, 10.0.0.11. They can belong to another network. |
| DHCP scope: first IP, DHCP scope: last IP | The addresses handed out by DHCP: host addresses of the network, in ascending order. They are not proposed as free addresses. |
| Notes, Tags | Free text, and up to 10 comma-separated tags to group and filter networks. |
Custom fields for networks appear at the bottom of the form, in the Custom fields section.
The same network can exist in different sites or companies, for example 192.168.1.0/24 in two branch offices. In the same site and company, networks cannot overlap: a new network cannot lie inside an existing one, nor contain one. To create subnets, use Split into subnets on the existing network. A network that has subnets, or is a subnet, keeps its CIDR, site and company: change them with Split or Merge, or delete the subnets first.
Which network an address goes into
- An address always goes into the most specific network: if it falls within a subnet, it goes into the subnet.
- A network device goes into the network with the same site as the device. If the device has no site, it goes into the network without a site, or into the only network that contains its address. The site of a network device is set in its page (see Network Devices); if you leave it empty, the device takes the site of its network.
- A computer goes into a network of its own company. If its address falls within networks of more than one site, the computer cannot be placed: the network list shows a warning icon with the number of adapters left out.
Splitting and merging
Split into subnets divides a network into equal subnets:
- Click the scissors icon of the network.
- Choose the New prefix (subnets): up to 8 bits more than the network, down to /30, at most 256 subnets.
- Click Preview, check the subnets, then click Create … subnets to confirm.
The original network stays as the parent of the new subnets. The subnets take its site, company and VLAN; manually entered addresses and reserved ranges move into the right subnet by themselves. Gateway, DNS and DHCP scope stay on the parent network.
Merge with "…" appears when a network has a twin: the other half of the same larger network, with the same site and company. The page explains what happens before you confirm:
- if the larger network already exists, the two halves are deleted and their manual addresses, reserved ranges and history move to it;
- otherwise the first network is widened to the larger CIDR and absorbs the second, which is deleted. The first keeps its name, VLAN, gateway, DNS, DHCP scope, notes and tags; from the second only the manual addresses, reserved ranges and history move over.
Deleting a network
A network can be deleted only when it has no subnets and no manually entered addresses: delete the subnets (or merge them) and move or delete the manual addresses first. The trash icon stays disabled, and its tooltip tells you why. Reserved ranges of a subnet move back to the parent network. Automatic addresses come back by themselves if they fall within another network.
The addresses of a network
Click the first icon of a network to open IPAM — Details. Full list, in the network list, shows the addresses of all networks together.
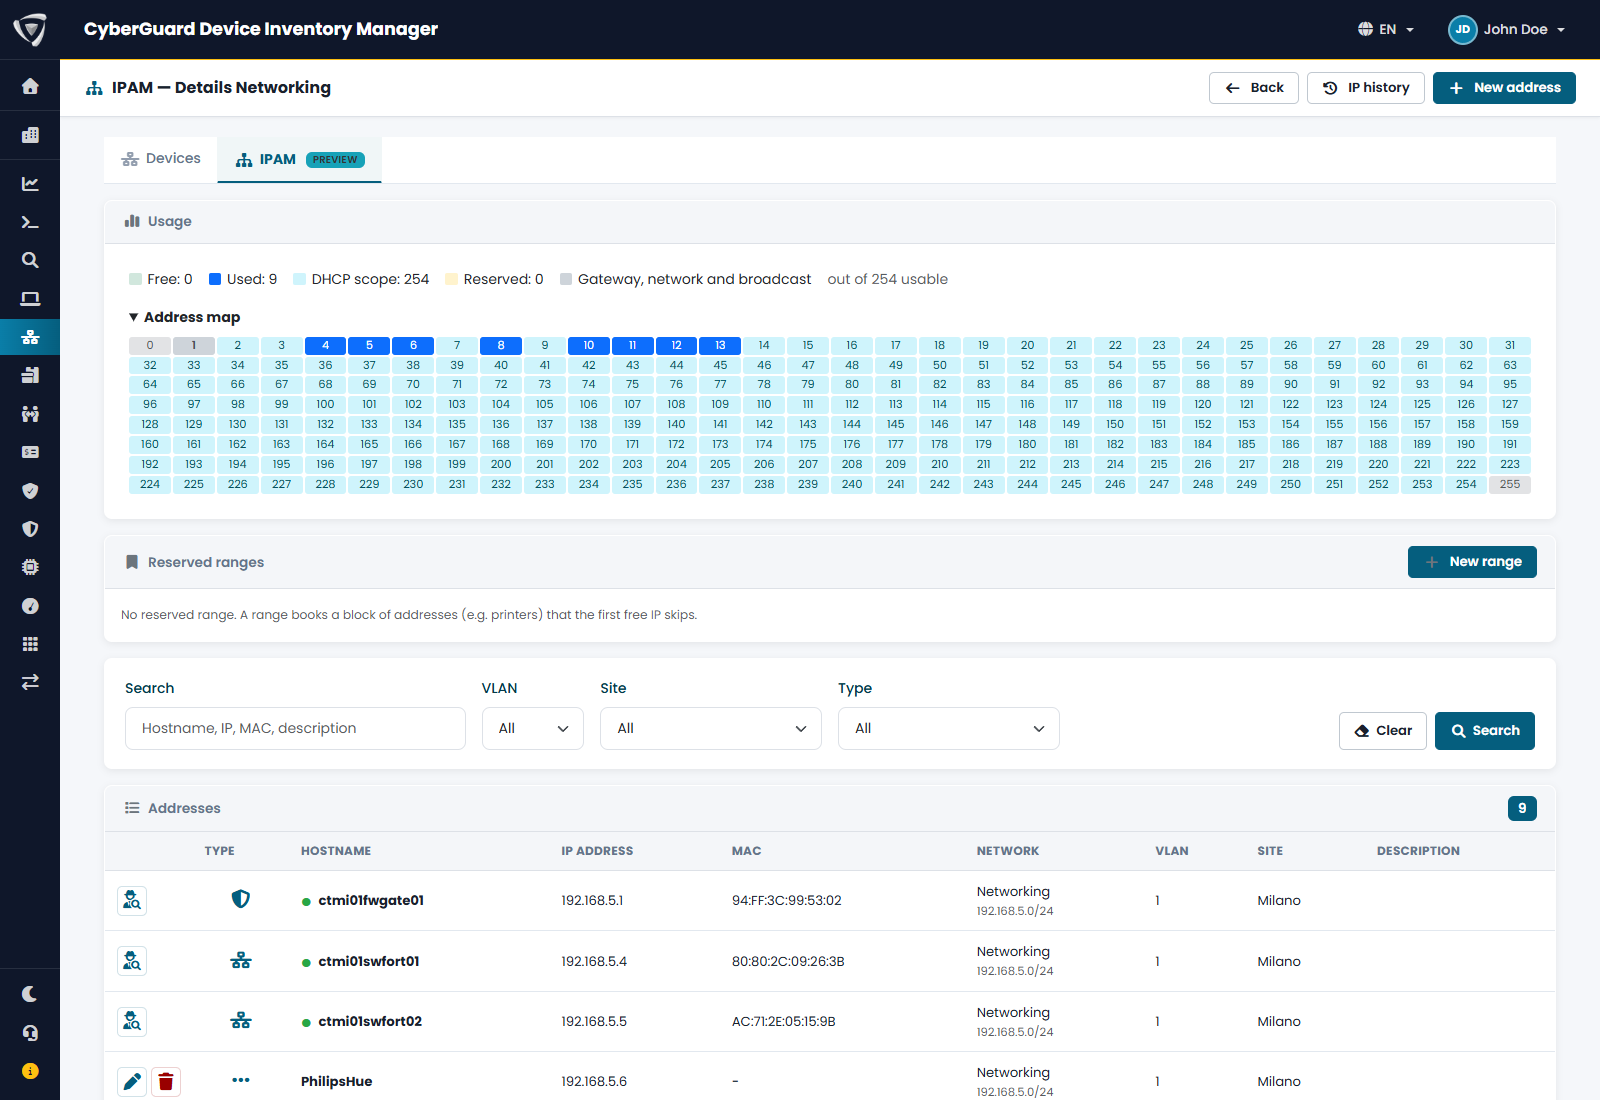
Usage
The Usage card counts the Free, Used, DHCP scope and Reserved addresses, the subnets, and the usable addresses of the network. The Address map draws one cell per address for networks up to /22: click a free cell to add an address there, or a subnet cell to open the subnet.
The New address button in the card proposes the first free address: the first one that is not used, not in the DHCP scope and not in a reserved range.
Reserved ranges
A reserved range books a block of addresses, for example Printers from 10.0.10.200 to 10.0.10.220. The first free address skips it, but you can still add addresses to it by hand.
- In Reserved ranges, click New range.
- Enter a Name, the First IP and the Last IP, and optional Notes.
- Click Save.
A range must lie within the network and cannot overlap the DHCP scope, another range or a subnet. The table shows how many addresses of each range are used and free; the plus icon adds an address in the range. Deleting a range keeps the addresses it contains.
The address list
| Column | Content |
|---|---|
| Type | The icon of the device type and the source: from scan, Windows PC with its adapter, Mac, entered manually. |
| Hostname | For network devices, a dot shows whether the device responded to the last scan (green), did not respond (red), or the probe has not scanned recently (grey). |
| IP address | An icon warns when two rows of the same network share the address, for example an address reserved by hand that a computer is using. |
| MAC | The MAC address. |
| Network, VLAN, Site | Where the address is. Company appears if your organization has several companies. |
| Description | The description of the address. |
Address custom fields appear as additional columns.
Filter by Search (hostname, IP, MAC, description), Network, VLAN, Site, Type and Tag, then click Search.
The icon at the start of a row opens the page of the network device or computer. For manually entered addresses it opens the address form, and the trash icon deletes the address. Automatic addresses cannot be edited here: change the device instead. For a network device, you can write the IPAM Description in its page.
Adding an address by hand
- Click New address, or click a free cell of the map.
- Choose the Network: VLAN, Site and Company come from it.
- Enter the IP address, or click the wand icon next to it to fill in the first free address of the network.
- Fill in what you need: Type, Hostname, MAC (saved as
AA:BB:CC:DD:EE:FF), Description, Notes, Tags and, at the bottom, the custom fields. - Click Save.
The address must belong to the chosen network, and not to one of its subnets; the network and broadcast addresses cannot be assigned. If it belongs to a subnet, the form tells you which subnet to use. Each IP address can be entered by hand only once per network.
To add many addresses at once, use Import › IPAM (see Import).
IP history
IP history, in the network list or in a network, shows who had an address and when: each row is a closed period, with the IP, Hostname, MAC, Source, Network, From, To and the Reason:
- IP changed: the device moved to another address;
- Hostname changed: the name on the address changed;
- Left the catalog: the address was deleted, or the device left the network.
Search by IP, hostname or MAC. The history is kept for 365 days.
VLANs
The VLANs page gives names to VLAN numbers. Networks store only the number; the name comes from the VLAN with the same number for the same company and site, or from the one valid for all sites.
- Click New VLAN.
- Enter the VLAN number, the Name, and optionally the Site (empty means all sites), the Company and a Description.
- Click Save.
The page also lists the numbers used by networks that are not in the catalog yet, marked not catalogued: click Give it a name (add to the catalog) to name them. Once networks use a VLAN, only its name and description can change, and it cannot be deleted until no network uses it.
Custom fields
Custom fields adds your own fields to networks or to manually entered addresses, for example Contact person, Serial number or Admin password. You fill them in the Custom fields section at the bottom of the forms; they appear as columns in the lists and in the export.
- Click New field.
- Enter the Name, choose whether it Applies to Networks or Addresses, choose the Type and set the Order of the column.
- Click Save.
| Type | What you can enter |
|---|---|
| Text | Any text, up to 500 characters. |
| Number | A number; both comma and point are accepted as decimal separator. |
| Date | A date, chosen from the calendar. |
| Yes/No | Yes, No or empty. |
| Password | A password, stored encrypted. |
Passwords are never shown in clear text: lists and forms show •••••••• with an eye icon. Click the eye to see the password, and again to hide it. Every time a password is shown, the audit log records who saw it, which field and which network or address. Passwords are not included in the export. A partner with MSP Access cannot show them.
When editing a network or an address, leave a password empty to keep it, type a new one to change it, or tick Remove the password to delete it.
You can change the type of a field that already has values: values that fit the new type are converted, and a text field that becomes a password has its values encrypted. If even one value does not fit, the change is refused. A password field that has values cannot change to another type.
You can create up to 10 fields for networks and 10 for addresses. Deleting a field deletes all the values entered in it.
Subnet calculator
Calculator works out a network without registering anything. Enter the Network (CIDR) and click Calculate to see the Mask, Wildcard, Network address, Broadcast, the range of Hosts, the Usable hosts and whether the network is Private or Public. Choose a value in Split into to see the subnets you would get.
Networks almost full
The Networks almost full email notification warns you when a network goes over a usage threshold, 90% unless you change it. In the network list, the percentage of a network over the threshold is shown in red.
Each network is reported once; the alert is armed again when the network drops 5 points below the threshold. Usage includes the subnets. Set it up in My Tenant › Edit › Notifications (see Email Notifications).
Import and export
- Import › IPAM adds or updates manually entered addresses from a CSV file, in networks that already exist. See Import.
- Export › IPAM downloads the addresses of all networks, with their source, status and custom fields. See Export.
Permissions
IPAM is available to users whose permission group includes the IPAM module (see Users & Permissions). Import and export of IPAM data also require the import and export permissions.
A partner with MSP Access sees networks and addresses in read-only mode.